Copying to the Template
Each week the Pastor sends you a draft of the bulletin, usually as a Word document. It’s formatted differently from the official bulletin. Your job is to copy the words and pictures from the Pastor’s draft into our template, so the bulletin looks the same every week.
Note: Some of the screenshots below were taken in LibreOffice Draw. The templates now use LibreOffice Writer, so some menus may look slightly different.
Before You Start
You’ll need:
- The Pastor’s draft (from your email)
- Your
@partnership.placeGoogle account (you have to be signed in to see the templates) - LibreOffice or Word (see Word Processor)
- The fonts Source Serif and Source Sans. If they’re not installed, download them from Adobe. If you skip this, the bulletin will look wrong.
File Names
Bulletins are named by the service date: the year, then the month, then the day, with no spaces or dashes. For example, the bulletin for November 23, 2025 is called:
20251123.odt.odtis a LibreOffice Writer file..odgis a LibreOffice Draw file..docxis a Microsoft Word file.
Step 1: Get Your Copy of the Template
Open the bulletin templates on Google Drive.
Download last week’s bulletin (for example
20251116.odt).Rename it to this week’s date (for example
20251123.odt).Always rename it before you start editing. That way you can’t accidentally overwrite last week’s bulletin.
Open both files side by side: the Pastor’s draft on one side and your renamed copy on the other.
Step 2: Replace the Front Picture
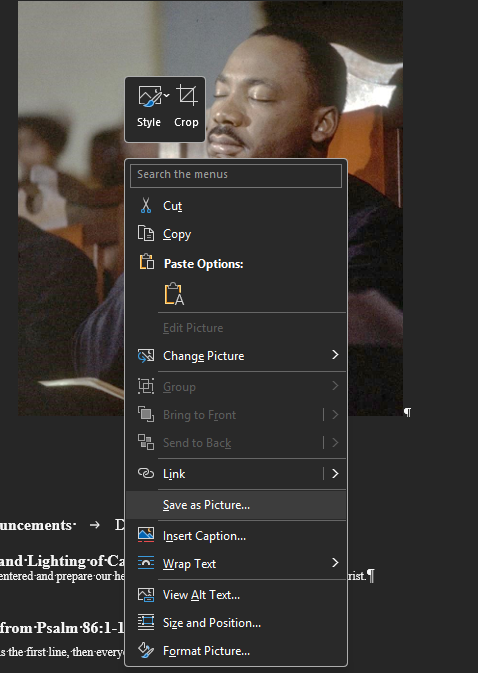
In the Pastor’s draft, right-click the picture on the front page and select Save as Picture. It’s saved to your Pictures folder unless you choose somewhere else.
In your copy, delete last week’s picture.
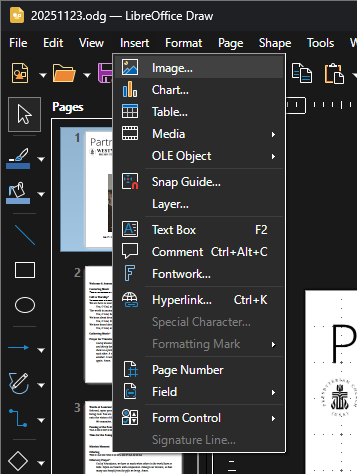
Click Insert → Image on the toolbar and choose the picture you just saved.
If you need to resize it, drag a corner handle, not a side handle. Side handles squash or stretch the picture.
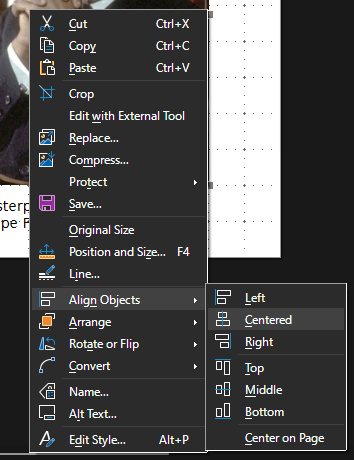
To center it, right-click the picture and select Align Objects → Centered. (In Word, drag the picture until a vertical green line appears in the middle of the page.)
Step 3: Copy the Text
Change the date at the top first. It’s the easiest thing to forget.
In the Pastor’s draft, highlight the front cover quote and copy it (Ctrl+C).
In your copy, highlight last week’s quote.
Right-click and select Paste Special → Unformatted Text. (Shortcut: Ctrl+Alt+Shift+V. In Word, right-click and choose the Keep Text Only paste option instead.)
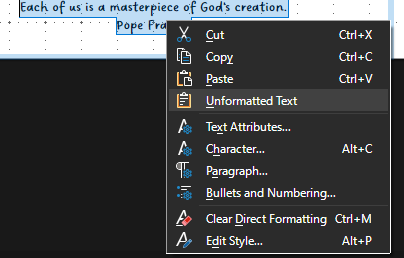
Always paste this way, never with a plain Ctrl+V. Unformatted Text takes the Pastor’s words but not her formatting, so the pasted text matches the template. A plain Ctrl+V brings in the wrong fonts and spacing, which are hard to clean up.
Repeat for every section of the bulletin, working from the front to the back.
Step 4: Check It
Before you print, look over the whole bulletin:
- The date at the top is this Sunday’s.
- Every section has been replaced. Nothing from last week is left over.
- No heading is stuck at the bottom of a page with its text on the next page.
- No paragraph is split across two pages.
- The file is saved with this week’s date as its name.
Step 5: Print
Use these printer settings:
- Paper size: Legal (8.5 x 14 in)
- Orientation: Landscape
- Two-sided: Flip on Short Edge
- Layout: Brochure/Booklet
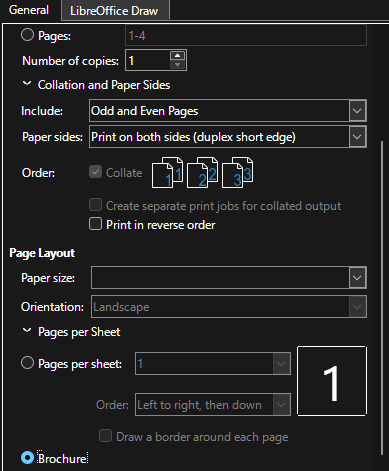
Print one copy first and fold it by hand to check that the pages come out in the right order. Then print the rest.
Once they’re printed, continue to the folding machine.
Tips
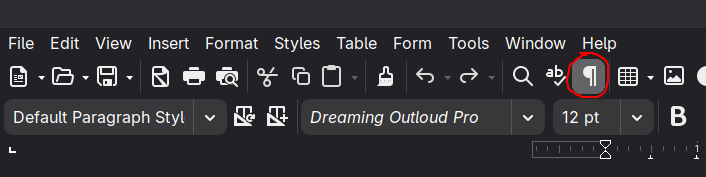
Turn on formatting marks
Click the ¶ button on the toolbar to show the hidden marks for spaces, tabs, and line breaks. It makes it much easier to see why something isn’t lining up. The marks don’t print.
New line vs. new paragraph
- Enter starts a new paragraph, with a small gap above it.
- Shift+Enter starts a new line in the same paragraph, with no gap.
Keeping the layout clean
The Pastor prefers a clean layout. The most important rule is to keep related things together:
- Don’t let a paragraph split across two pages.
- Don’t leave a heading at the bottom of a page with its text on the next page.
Add blank lines above the heading or paragraph to push it onto the next page.
Indented text
In many places, text is moved over three inches. This is done with Tab, not by changing the margins. In Word, if pressing Tab moves the whole paragraph, press Ctrl+Tab instead.
Back page
The back page has lots of small chunks of text, some side by side. Don’t use Word’s column feature for this, because it’s very hard to work with. Use text boxes with invisible borders instead.
Pictures in Word
In Word, pictures push text out of the way, which makes them hard to move. To move a picture freely, right-click it and select Wrap Text → In Front of Text.